Key takeaways
- Using Metal Prying Tools: Metal spatulas, screwdrivers, or pocket knives can easily puncture a lithium-polymer battery, releasing hot, toxic gas and creating an immediate fire hazard. Stick exclusively to plastic spudgers.
- Yanking the Battery Wires: Pulling the red and black wires to disconnect the battery can tear the wires out of the plastic JST terminal, leaving the connector stuck in the socket or causing a short circuit.
- Mixing Up Screws: Many handhelds use screws of slightly different lengths. Putting a long screw into a hole meant for a short screw can drive the tip directly into the LCD screen or a critical motherboard trace.
- Ignoring Swollen Batteries: If your old battery looks puffy, rounded, or like a pillow, it is damaged. Handle it with extreme care, do not bend it, and place it in a fire-safe container immediately.
- Neglecting to Remove Micro SD Cards: Forgetting to take out your micro SD cards before separating the casing halves is a guaranteed way to snap the cards in half, destroying your game saves and operating system.
What's inside
Retro handheld gaming consoles have experienced a massive resurgence, bringing nostalgic 8-bit and 16-bit adventures straight to our fingertips. However, as these portable devices age, their internal power sources inevitably degrade. By 2026, many of the classic open-source handhelds released over the last several years will require a fresh battery to maintain their runtime and prevent safety hazards.
Attempting a battery swap without the proper preparation can lead to disastrous results. A rushed DIY job can permanently damage your device. Using sharp metal tools near a sensitive lithium-polymer (Li-Po) cell risks puncturing the protective casing, which can cause chemical burns, toxic smoke, or a dangerous thermal runaway fire. Furthermore, pulling too hard on the plastic shell can rip delicate, 0.5-millimeter ribbon cables, instantly ruining your screen or control inputs. Stripping the tiny casing screws or forcing a battery with the incorrect voltage can permanently brick a beloved console. With the right tools and a patient approach, however, this project is a highly rewarding afternoon task that will restore your handheld to its former glory.
As an Amazon Associate we earn from qualifying purchases at no extra cost to you. Product prices and availability are accurate as of the date shown and are subject to change.

What You Need
Before opening your console, gather the precise tools required for delicate electronics work. Using the wrong screwdriver size will strip the soft metal screws common in these devices, turning a simple 20-minute repair into a major headache.
| Item | Why You Need It | Optional? |
|---|---|---|
| Precision Screwdriver Set | To remove tiny casing screws (typically Phillips #00, #000, or Torx T5/T6). | No |
| Plastic Spudger / Prying Tool | To safely separate the plastic halves of the console shell without scratching the plastic or damaging internal components. | No |
| Replacement Battery | To restore power. Must match the voltage (typically 3.7V or 3.8V) and fit the physical dimensions of your device’s battery bay. | No |
| Thin Double-Sided Electronics Tape | Secures the new battery in place so it does not rattle inside the shell during gameplay. | Yes (Recommended) |
| Safety Glasses | Protects your eyes in the rare event of a battery puncture or spark. | Yes (Recommended) |
| Tweezers (Non-Conductive) | Helps position tiny wires and disconnect small JST power plugs. | Yes |
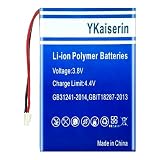
When sourcing a replacement, look for high-quality cells specifically designed for your model. For instance, the Liter 3.8V 3000mAh Rechargeable Battery Suitable for R36S Retro Handheld Game Console (priced around $17.99) is an excellent, direct-fit choice for budget vertical handhelds. If you are upgrading a horizontal device, the RG351P 4200mAh Ultra-Power Retro Handheld Game Console Battery (priced around $24.19) offers an extended capacity that can add hours of playtime to your gaming sessions.
Step-by-Step
Follow these steps carefully to ensure a safe and successful battery replacement. Work on a clean, well-lit, non-static surface such as a wooden table or an anti-static silicone mat.
Step 1: Drain the Old Battery (Time Estimate: Variable)
Before beginning any physical disassembly, turn on your console and run the battery down below 25%, or ideally until the device shuts off entirely. A fully charged lithium battery contains a high amount of stored energy; if accidentally punctured during removal, a charged battery is far more likely to spark or catch fire than a depleted one.
Step 2: Prepare the Workspace and Power Down (Time Estimate: 3 minutes)
Completely power off the console. Remove any external accessories, such as micro SD cards, wrist straps, or decorative cases. Removing the micro SD cards is crucial, as the cards can snap in half when you separate the two halves of the console frame.
Step 3: Remove the Back Shell Screws (Time Estimate: 5 minutes)
Flip the console face down onto a soft cloth to protect the screen. Locate the screws holding the rear shell in place. Most retro handhelds use four to six small screws, often measuring between 4mm and 6mm in length. Use the correct precision screwdriver tip to loosen them. Keep these screws organized in a small tray; they are exceptionally easy to lose, and mixing up different lengths during reassembly can damage the internal circuit board.
Step 4: Pry the Casing Open (Time Estimate: 5 minutes)
Insert your plastic spudger or a thin guitar pick into the seam where the front and back plastic halves meet. Gently slide the tool along the perimeter to release the internal plastic clips. Go slowly and listen for the light clicking sounds of the clips releasing. Do not force the halves apart immediately once they loosen, as there may be speaker wires or battery cables connecting the motherboard to the back plate.
Step 5: Disconnect the Battery Plug (Time Estimate: 4 minutes)
Carefully separate the shell halves by an inch or two to inspect the interior. Identify the wire leads running from the battery to the motherboard. Most modern retro handhelds use a tiny, white JST connector (usually a 1.25mm or 2.0mm pitch plug). Using your fingers or non-conductive plastic tweezers, grip the plastic housing of the plug and pull it straight out of its socket. Never pull directly on the red and black wires, as this can rip the wires out of the connector or damage the solder joints on the motherboard.
Step 6: Safely Extract the Old Battery (Time Estimate: 5 minutes)
Most manufacturers secure the battery to the inner shell or the motherboard frame using double-sided adhesive tape. Slide a flat plastic card (like an old gift card) underneath the battery. Slowly wiggle the card back and forth to saw through the adhesive grip. Do not use metal screwdrivers, metal tweezers, or knives for this step, as they can easily slice open the soft silver pouch of the battery.
Step 7: Install the New Battery (Time Estimate: 5 minutes)
Take your new power source—such as the Liter 3.8V 3000mAh battery for vertical shells or the high-capacity RG351P 4200mAh battery for compatible horizontal layouts—and apply a small strip of thin double-sided electronics tape to its underside. Press the battery firmly into the designated battery compartment, ensuring the wires are routed cleanly and will not be pinched when the console is closed. Plug the JST connector into the motherboard socket; it is keyed to only fit in one direction, so do not force it if you feel resistance.
Step 8: Reassemble and Test (Time Estimate: 5 minutes)
Align the front and rear halves of the console casing. Gently press them together until you hear the plastic clips snap back into place. Before putting the screws back in, perform a quick test: turn the console on to verify that the screen boots up and the battery level displays correctly. Once verified, power the system down and reinstall the casing screws. Do not over-tighten them, as you can easily crack the ABS plastic housing or strip the threads.
Mistakes to Avoid
- Using Metal Prying Tools: Metal spatulas, screwdrivers, or pocket knives can easily puncture a lithium-polymer battery, releasing hot, toxic gas and creating an immediate fire hazard. Stick exclusively to plastic spudgers.
- Yanking the Battery Wires: Pulling the red and black wires to disconnect the battery can tear the wires out of the plastic JST terminal, leaving the connector stuck in the socket or causing a short circuit.
- Mixing Up Screws: Many handhelds use screws of slightly different lengths. Putting a long screw into a hole meant for a short screw can drive the tip directly into the LCD screen or a critical motherboard trace.
- Ignoring Swollen Batteries: If your old battery looks puffy, rounded, or like a pillow, it is damaged. Handle it with extreme care, do not bend it, and place it in a fire-safe container immediately.
- Neglecting to Remove Micro SD Cards: Forgetting to take out your micro SD cards before separating the casing halves is a guaranteed way to snap the cards in half, destroying your game saves and operating system.
How Often to Replace the Battery
Lithium-polymer batteries typically have a lifespan of 300 to 500 complete charge-discharge cycles before their capacity drops below 80% of its original rating. For a moderate gamer, this translates to roughly three to five years of use. You should replace the battery immediately if you notice the console’s runtime dropping significantly (e.g., lasting only 45 minutes instead of 4 hours), if the device struggles to hold a charge when stored, or if you notice any physical bulging of the console’s rear shell.
When to Call a Pro or Replace the Console
While most modern retro handhelds feature modular, plug-and-play JST battery connectors, some older or ultra-compact systems require soldering the battery leads directly to the motherboard. If you open your console and find that the battery wires are soldered directly to the circuit board, and you do not have experience with a 15W to 30W electronics soldering iron, it is best to take the device to a local electronics repair shop. Additionally, if the motherboard shows signs of corrosion, liquid damage, or severe burn marks around the power management chip, a simple battery replacement will not fix the underlying issues, and the console should be replaced.
FAQ
Can I use a higher capacity (mAh) battery in my console?
Yes, as long as the voltage matches the original battery specifications (usually 3.7V or 3.8V) and the physical dimensions of the battery pack fit inside the console’s compartment without being squeezed or pinched. A higher milliamp-hour (mAh) rating simply means the battery holds more energy, resulting in longer playtimes between charges.
How do I safely dispose of the old battery?
Never throw lithium-polymer batteries into your household trash. They pose a major fire hazard for waste management facilities. Place the old battery in a plastic bag and drop it off at an authorized e-waste recycling center, home improvement store, or local battery retail outlet that accepts rechargeable batteries.
Why is my new battery not charging or showing the wrong percentage?
Most retro handheld operating systems use simple voltage-based battery indicators that need to be calibrated. After installing a new battery, charge the console uninterrupted for at least 4 to 6 hours. Then, use the console until it shuts down from low power. Repeating this cycle once or twice will calibrate the software to the new battery’s capacity.
Can I charge my handheld with a fast charger?
It is highly recommended to avoid using high-wattage fast chargers (such as USB-C laptop chargers or 45W phone adapters) with retro handhelds. Many of these budget devices lack advanced power negotiation chips and can overheat or burn out when connected to high-wattage sources. Stick to a standard 5V/1A or 5V/2A charging brick.