Key takeaways
- Do Not Use WD-40 Multi-Use Product: Standard WD-40 is not a lubricant; it is a solvent and water-displacer. It will break down the plastic parts of your joystick over time and leave behind a sticky, dust-attracting film. Only use dedicated electronic contact cleaners or 99% isopropyl alcohol for cleaning, and silicone-based grease for lubrication.
- Avoid Over-Lubricating: A little grease goes a long way. Applying too much silicone grease will cause it to overflow onto the microswitches, trapping dust and creating a thick, grinding paste that slows down inputs.
- Watch Out for the E-Clip: The e-clip is spring steel and under tension. If you pry it off carelessly, it can fly across the room and become permanently lost. Always keep a finger or a piece of tape over it during removal.
- Never Use Low-Concentration Rubbing Alcohol: Standard 70% isopropyl alcohol contains 30% water, which dries slowly and can cause rust on your steel spring and corrosion on your microswitch terminals. Always use 91% or 99% IPA.
What's inside
For fighting game enthusiasts and arcade cabinet owners, the joystick is more than just a controller—it is an instrument of precision. When you execute a complex motion, you expect the hardware to register every frame perfectly. However, over hours of intense play, sweat, dust, pet hair, and degraded factory grease inevitably find their way into the heart of your controller: the microswitches and the tension spring.
If you ignore this buildup, your inputs will begin to drop, your stick will feel sluggish, and your execution will suffer. But cleaning these sensitive components requires a delicate touch. If done poorly, you risk ruining your controller. Using the wrong solvents, such as standard WD-40, can melt delicate plastics or leave a sticky residue that attracts even more dirt. Losing the tiny e-clip (typically measuring just 1/16 to 1/8 of an inch) can render your stick useless until you find a replacement. Worst of all, using conductive water-based cleaners can permanently short out your controller’s printed circuit board (PCB), turning a premium $150 to $300 arcade stick into an expensive paperweight. Maintaining your high-end fight stick is more important than ever to preserve your muscle memory and protect your investment.
As an Amazon Associate we earn from qualifying purchases at no extra cost to you. Product prices and availability are accurate as of the date shown and are subject to change.

This comprehensive guide will walk you through how to safely disassemble, clean, and lubricate your arcade stick’s microswitches and tension springs to restore that crisp, out-of-the-box feel.
What You Need
Before you begin, gather your tools. Having the correct supplies prevents accidental damage to the plastic housings and delicate internal wiring.
| Item | Why You Need It | Optional? |
|---|---|---|
| 99% Isopropyl Alcohol (IPA) | Dissolves old grease and grime without leaving conductive residue or damaging plastics. | No |
| Precision Screwdriver Set | To open the outer case (usually Phillips #1 or #2) and remove mounting plates. | No |
| Needle-Nose Pliers | To safely pry off and hold the tiny e-clip at the bottom of the joystick shaft. | No |
| High-Quality Silicone Grease | For lubricating the pivot and spring (e.g., Shin-Etsu G-40M or Krytox GPL 205). Avoid petroleum jelly. | No |
| Cotton Swabs & Microfiber Cloths | For precision scrubbing of microswitch plungers and wiping away old grease. | No |
| Compressed Air Can | To blow out loose dust, lint, and debris from tight spaces. | Yes |
| Replacement Tension Springs | To replace rusted, stretched, or weak stock springs (usually rated at 0.9lb of resistance). | Yes |
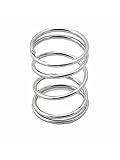
If you notice your joystick has lost its snap and fails to quickly return to the center, cleaning might not be enough. In these cases, swapping out the spring is highly recommended. Excellent and affordable options include the Auto-plaza 8pcs 2lb 4lb Springs for Sanwa JLF Joysticks Stainless Steel Springs for Games Box Sticks (4pcs 4lb + 4pcs 2lb springs) for $9.99, or the SZJLMKJ 4pcs 4lb Springs for Sanwa JLF Joysticks Stainless Steel Springs for Games Box Sticks for $11.99. These stainless steel springs offer different levels of tension to customize your stick’s resistance.
Step-by-Step
Set aside a clean, well-lit workspace. This entire process takes about 60 minutes.
Step 1: Unplug and Prepare Your Workspace (Time: 5 Minutes)
Safety is paramount. Unplug your arcade stick from your console or PC. Place a soft towel or a magnetic project mat on your desk to protect the face of your arcade stick from scratches and to keep your screws from rolling away.
Step 2: Open the Case and Remove the Ball Top (Time: 10 Minutes)
Flip the arcade stick face down. Use your screwdriver to remove the screws securing the bottom plate (typically 6 to 8 screws). Once inside, locate the bottom of the joystick shaft. Insert a flathead screwdriver into the slot at the base of the shaft to keep it from spinning, then manually unscrew the ball top or bat top counter-clockwise from the top of the controller. Slide off the dust washers.
Step 3: Remove the E-Clip and Disassemble the Shaft (Time: 10 Minutes)
Locate the small, metallic e-clip at the very bottom of the joystick shaft holding the actuator in place. Place your thumb over the e-clip to prevent it from flying off, and use your needle-nose pliers to gently push or pull the clip off the shaft. Once the e-clip is removed, carefully slide off the plastic actuator, the spring base, the tension spring, and the nylon pivot. Keep these parts organized in the order you removed them.
Step 4: Clean and Inspect the Spring (Time: 5 Minutes)
Submerge the metal spring in a small cup of 99% isopropyl alcohol or wipe it down thoroughly with a microfiber cloth soaked in the alcohol. Scrub away any brown, oxidized grease or rust. If the spring is visibly warped, rusty, or has lost its elasticity, replace it. Upgrading to a stiffer spring, such as a 2lb or 4lb option from the Auto-plaza 8-piece set ($9.99) or the SZJLMKJ 4-piece 4lb pack ($11.99), will give your stick a much faster return-to-center time, which is highly prized for fast-paced input games.
Step 5: Clean the Microswitches (Time: 15 Minutes)
Most arcade sticks use a assembly of four microswitches (like Sanwa, Seimitsu, or Cherry). Do not submerge the microswitches in liquid. Instead, dip a cotton swab in 99% isopropyl alcohol and carefully clean the exterior casing, focusing on the small plastic plungers that get depressed when the joystick moves. Press the plungers repeatedly while applying a small drop of alcohol to help dissolve any internal dust or dried soda. Use compressed air to blow out any loosened debris and accelerate drying. Clean the metal terminal contact tabs with your microfiber cloth to ensure a perfect electrical connection.
Step 6: Lubricate the Components and Reassemble (Time: 15 Minutes)
Before reassembling, you must re-lubricate the moving parts to prevent friction wear. Apply a thin, even layer of silicone grease to the nylon pivot and the pivot socket. Apply a very light coat of grease to the spring itself to prevent corrosion and eliminate squeaking. Slide the pivot, spring, spring base, and actuator back onto the shaft. Carefully snap the e-clip back into its groove on the shaft using your pliers. Reattach the dust washers and screw the ball top back on.
Mistakes to Avoid
- Do Not Use WD-40 Multi-Use Product: Standard WD-40 is not a lubricant; it is a solvent and water-displacer. It will break down the plastic parts of your joystick over time and leave behind a sticky, dust-attracting film. Only use dedicated electronic contact cleaners or 99% isopropyl alcohol for cleaning, and silicone-based grease for lubrication.
- Avoid Over-Lubricating: A little grease goes a long way. Applying too much silicone grease will cause it to overflow onto the microswitches, trapping dust and creating a thick, grinding paste that slows down inputs.
- Watch Out for the E-Clip: The e-clip is spring steel and under tension. If you pry it off carelessly, it can fly across the room and become permanently lost. Always keep a finger or a piece of tape over it during removal.
- Never Use Low-Concentration Rubbing Alcohol: Standard 70% isopropyl alcohol contains 30% water, which dries slowly and can cause rust on your steel spring and corrosion on your microswitch terminals. Always use 91% or 99% IPA.
How Often Should You Clean?
The frequency of your maintenance depends entirely on how often you play and your environment:
- Casual Gamers (3–5 hours a week): Clean and re-lubricate your joystick once every 12 to 18 months.
- Competitive Players (10+ hours a week): Perform a deep clean and check spring tension every 6 months to ensure optimal execution.
- Household Variables: If you live with shedding pets, smoke, or frequently eat snacks while playing, you should clean your stick every 3 to 4 months to prevent hair and oils from clogging the microswitches.
When to Call a Pro or Replace
While cleaning solves most input issues, some hardware degradation cannot be wiped away. You should replace components if you experience the following:
- Dead Microswitches: If a microswitch no longer makes a distinct, tactile “click” sound when pressed, or if it fails to register inputs even after cleaning, the internal copper leaf spring is likely fatigued. Individual microswitches are inexpensive, generally costing between $2.00 and $5.00 each.
- Extreme Rust: If your tension spring has deep, pitted rust, do not try to save it. Replace it immediately to prevent rust particles from falling into the lower assembly. Upgrading to a stainless steel multi-pack (ranging from $9.00 to $12.00) is a quick, permanent fix.
- Cracked Plastic Housings: If the main body of the joystick lever (which costs around $20.00 to $35.00 to replace completely) is cracked or warped, cleaning will not restore its accuracy. Replace the entire lever assembly.
FAQ
Can I clean my microswitches without desoldering them?
Yes. Most modern arcade sticks use a quick-disconnect wiring harness or snap-in microswitches that do not require desoldering. If your microswitches are soldered directly to a PCB assembly, you can still clean the plungers and casing using cotton swabs lightly dampened with 99% isopropyl alcohol without removing them from the board.
What is the difference between a 2lb and a 4lb tension spring?
The weight rating indicates how much force is required to compress the spring. A stock Sanwa spring is rated at approximately 0.9lb. A 2lb spring provides a moderate increase in tension, making the stick feel snappier and faster to return to center. A 4lb spring is significantly stiffer, preferred by players who want maximum resistance to prevent accidental inputs during high-stress matches.
Can I use dielectric grease to lubricate my joystick?
Yes. Dielectric grease is a silicone-based, non-conductive lubricant, making it safe for the plastic and metal components of your arcade stick. However, ensure it does not contain petroleum distillates, which can degrade the nylon pivot and plastic housing over time.
Why does my joystick feel loose even after cleaning and lubricating?
If your joystick still feels loose or has too much “play” around the center deadzone, your tension spring has likely stretched out and lost its structural memory. Replacing the worn-out stock spring with a fresh 2lb or 4lb stainless steel spring will instantly restore the tight, responsive feel of a brand-new controller.