Our Top Picks
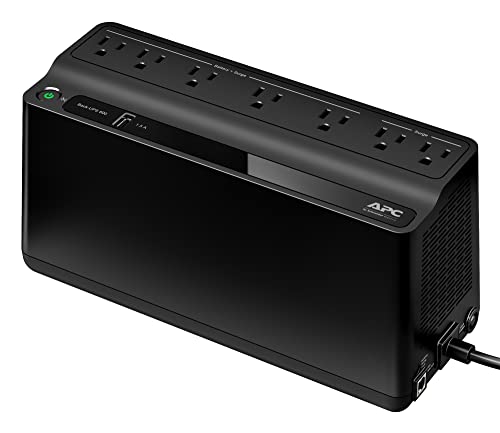 APC BE600M1 UPS Battery Backup & Surge Protector4.13D x 10.79W x 5.47H inches10.79 x 4.13 x 5.47 inches7.5 PoundsCheck on Amazon
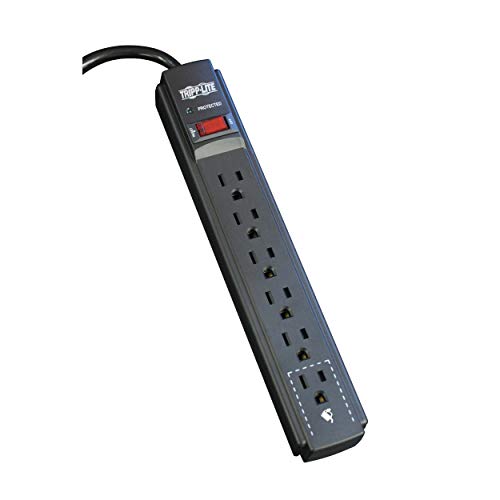 Eaton Tripp Lite TLP606B Black 6 Outlet Surge6 feet Cord6 x 1.65 x 1.26 Inches1.05 PoundsCheck on Amazon
 APC BX1500M UPS Battery Backup & Surge Protector1500VA15.04 x 3.94 x 9.84 Inches28.44 PoundsCheck on Amazon
 Amazon Basics 12-Outlet Surge Protector Power StripSmall13.39 x 6.3 x 1.57 Inches1.76 poundsCheck on Amazon
The right way to set up a gaming PC for the first time is to work in a fixed order: plug the monitor into the graphics card, enter the BIOS to enable your RAM profile, finish Windows 11 setup, run every Windows update, install the chipset and graphics drivers, set the monitor’s refresh rate, and only then install games and launchers. Doing the steps out of order is what causes the classic first-day complaints: a 144 Hz monitor stuck at 60 Hz, memory running slower than advertised, and a graphics card that “does nothing” because the drivers were never installed. This gaming pc setup guide walks through the whole sequence for a freshly built machine or a new prebuilt, with the reason behind every step.
Quick answer
| Step | What you do | Why it matters | Typical time |
|---|---|---|---|
| 1. Cables | Monitor into the graphics card output, keyboard and mouse into rear USB, Ethernet if you have it | Motherboard video ports are usually inactive when a graphics card is installed | 5 minutes |
| 2. BIOS | Enable XMP or EXPO, check fan and temperature readings | RAM often runs at a lower default speed until the profile is enabled | 10 minutes |
| 3. Windows setup | Region, network, account, privacy choices | A clean first-run avoids later cleanup | 20 minutes |
| 4. Updates | Windows Update until nothing is left | Delivers security fixes and many drivers | 20 to 40 minutes |
| 5. Drivers | Chipset, graphics, then network or audio if needed | The graphics driver unlocks full performance and features | 15 minutes |
| 6. Display | Set resolution and refresh rate; enable adaptive sync | Windows does not always pick the maximum refresh rate | 5 minutes |
| 7. Gaming settings | Game Mode, graphics preferences, storage layout | Reduces background interference | 10 minutes |
| 8. Protect it | Restore point, backup plan, account recovery | Gives you a safe starting point | 10 minutes |
Times are planning estimates for a first-timer and will vary with your internet speed and the number of pending updates. If your machine came preinstalled, treat steps 3 to 8 as the same checklist, but also remove trial software you do not want.
APC BE600M1 UPS Battery Backup & Surge Protector for Computer, Router, NAS | 600VA/330W backup battery power supply, USB charging, 490 J surge protect. Power through utility outages (23 minutes @ 100W)
Chosen because it specifies Router and NAS.
View on AmazonEaton Tripp Lite TLP606B Black 6 Outlet Surge Protector Power Strip | 6ft Power Extension Cord , 900 Joules, EMI/RFI Filtering, Under Desk & Wall Mountable, Warranty & $20,000 Insurance
Chosen because it specifies 6ft Power Extension Cord and 900 Joules.
View on AmazonAPC BX1500M UPS Battery Backup & Surge Protector for Computers, Electronics | 1500VA/900W UPS backup battery power supply, 10 Outlets, 789 Joule surge protect, AVR, UL certified. 68 minutes runtime @100W
Chosen because it specifies Electronics and 1500VA/900W UPS backup battery power supply.
View on AmazonAmazon Basics 12-Outlet Surge Protector Power Strip, 4000 Joules, 8ft Extension Cord, Rectangle, for Home, Office, Gaming Room, Black
Chosen because it specifies 4000 Joules and 8ft Extension Cord.
View on AmazonBefore you power on: how to set up a new PC build physically
If you built the PC yourself, this is where the how to setup new pc build story ends and the software story begins. If you bought a prebuilt, you start here too. Place the tower where air can enter the front and leave the rear or top, with at least a hand’s width of clearance at the intake side. Keep it off thick carpet, because dust gets pulled in by the fans.
- Monitor cable: plug the DisplayPort or HDMI cable into the graphics card, which sits in the lower area of the rear panel, not into the motherboard ports higher up. This is the most common reason a new gaming PC shows no picture.
- Use the right cable for the refresh rate: a monitor can only reach its top refresh rate through a cable and port that support it. See the bandwidth table later in this guide.
- Power: use a wall socket or surge protector. Switch the power supply switch on the rear of the PC to the on position before pressing the front power button.
- Peripherals: put the keyboard and mouse in the rear USB ports for the first boot, since the front panel ports can be skipped by some firmware screens.
Step 1: Visit the BIOS once, on purpose
Tap the key shown on the first screen (commonly Delete or F2) to enter the BIOS or UEFI setup. You do not need to change much, but three settings deserve attention.
Turn on XMP or EXPO
Memory modules are sold with a rated speed, but a motherboard may boot them at a default, slower speed until you enable the stored profile. Intel-oriented kits label the profile XMP, while AMD-oriented kits label it EXPO, and many boards accept either. Look for “XMP”, “EXPO”, “DOCP” or “A-XMP” in the memory or overclocking section, enable it, and save. After you reach Windows, open Task Manager, choose Performance, then Memory, and compare the displayed speed with the speed printed on your RAM kit. A DDR5 kit sold as 6000 MT/s will show a speed near 6000 in Task Manager once the profile is active, while a kit running at the default may show a figure several hundred to a couple of thousand lower. If the system becomes unstable after enabling the profile, update the BIOS first and then try again.
Check that the system sees everything
The BIOS home screen shows the CPU model, memory capacity and storage devices. If total memory is half of what you installed, one stick is not seated properly. If your boot SSD is missing, check the M.2 screw and connector.
Confirm TPM and Secure Boot readiness
Windows 11 requires a TPM 2.0 device and a Secure Boot capable UEFI firmware, according to Microsoft’s published requirements. On most modern boards the firmware TPM (fTPM on AMD, PTT on Intel) is already enabled. If Windows setup complains, return here and enable it. On a self-built PC with no operating system, you will also need a bootable Windows USB drive, covered in the next step; a prebuilt is normally ready as delivered.
Step 2: Windows 11 first-run setup
Windows 10 reached end of support on October 14, 2025, according to Microsoft, so a new gaming PC should run Windows 11. A prebuilt will walk you through the out-of-box experience on first boot. A self-built PC needs installation media first.
- Region and keyboard: pick the correct ones now; changing them later is possible but fiddly.
- Network: connect to the internet. Microsoft documents that Windows 11 Home needs an internet connection and a Microsoft account during initial setup.
- Account: a Microsoft account links your digital licence and lets you restore settings later. If your machine is for a child, create a family account instead.
- Privacy choices: decline optional diagnostic data and advertising ID if you prefer. These can all be changed later in Settings.
- PIN: set a Windows Hello PIN. It speeds sign-in and is tied to the device.
On a prebuilt, spend five minutes in Settings, then Apps, then Installed apps, and remove trial antivirus, bundled launchers you never intend to use, and any “optimizer” utility. Windows Security (Microsoft Defender) is built in and adequate for most gaming PCs.
Step 3: Run Windows Update until it is empty
Open Settings, then Windows Update, and click Check for updates. Install everything, restart, and repeat until it reports that you are up to date. This normally takes two or three rounds because some updates only appear after the first batch installs.
Also open Advanced options, then Optional updates, and look at the driver list. Windows can supply network, audio and chipset drivers here. Do not rely on it for your graphics driver, because the manufacturer’s download is typically newer and includes the control panel software.
Step 4: Install drivers in the right order
| Order | Driver | Where to get it | Notes |
|---|---|---|---|
| 1 | Chipset | AMD or Intel download page, or the motherboard maker | Enables correct power management and storage and USB behavior |
| 2 | Graphics | NVIDIA, AMD or Intel | Choose “Game Ready” or “Adrenalin” for gaming; a clean install option is fine on a new machine |
| 3 | Network (Wi-Fi or Ethernet) | Motherboard maker if Windows did not supply one | Install first if you have no connection |
| 4 | Audio | Motherboard maker | Usually fine from Windows Update |
| 5 | Peripheral software | Mouse, keyboard, headset makers | Install only what you use; avoid several RGB suites running together |
Restart after the chipset and graphics drivers. If the screen flickers or goes black for a few seconds during the graphics install, that is the driver switching modes and is normal.
Check the graphics card is doing the work
Open Device Manager, expand Display adapters, and confirm your graphics card is listed by name rather than “Microsoft Basic Display Adapter”. If you also see an integrated GPU, that is expected on some CPUs and nothing to fix.
Step 5: Set the resolution and refresh rate
Right-click the desktop, choose Display settings, scroll to Advanced display, and pick the highest refresh rate for your monitor. Windows often defaults to 60 Hz after the first install, particularly with HDMI cables, even when the monitor is rated for much more. If the option is missing, the cable, port or driver is the usual cause.
Worked example: does your cable have enough bandwidth?
Required bandwidth can be estimated as width times height times refresh rate times bits per pixel. At 8 bits per colour channel, that is 24 bits per pixel. The result is the raw pixel data rate before blanking overhead, so real links need extra margin, around 5 to 20 percent depending on timing.
| Mode | Calculation | Raw pixel data | Practical conclusion |
|---|---|---|---|
| 1080p at 144 Hz | 1920 x 1080 x 144 x 24 | About 7.2 Gbps | Fits HDMI 2.0 or DisplayPort 1.2 and newer |
| 1080p at 240 Hz | 1920 x 1080 x 240 x 24 | About 11.9 Gbps | Works on HDMI 2.0, but DisplayPort is the safer choice |
| 1440p at 165 Hz | 2560 x 1440 x 165 x 24 | About 14.6 Gbps | Above the roughly 14.4 Gbps usable data rate of HDMI 2.0, so use DisplayPort 1.4 or HDMI 2.1 |
| 4K at 120 Hz | 3840 x 2160 x 120 x 24 | About 23.9 Gbps | Needs HDMI 2.1 or DisplayPort 1.4 with compression, or DisplayPort 2.x |
The HDMI and DisplayPort figures come from the standards bodies’ published link rates: HDMI 2.0 offers 18 Gbps of raw bandwidth, of which about 14.4 Gbps is usable for video data, and DisplayPort 1.4 offers roughly 25.9 Gbps usable. The practical lesson is simple: for anything above 1080p at 144 Hz, use the DisplayPort cable in the monitor box rather than whichever HDMI cable you already own.
Enable adaptive sync
If your monitor supports G-Sync Compatible or FreeSync, enable it in the monitor’s on-screen menu first, then in the graphics control panel. It removes tearing without the lag penalty of traditional vertical sync. Many players pair it with a frame-rate cap a few frames below the monitor’s maximum so the game stays inside the adaptive-sync window.
Step 6: The graphics control panel
Open the NVIDIA app or NVIDIA Control Panel, AMD Software, or Intel Graphics Software. The defaults are sensible, so change only the few items that matter.
| Setting | Suggested starting value | Reason |
|---|---|---|
| Display resolution and refresh rate | Native resolution, highest refresh rate | Confirms what Windows chose |
| Adaptive sync (G-Sync or FreeSync) | On for full screen and windowed if supported | Smoother motion |
| Low-latency or similar mode | On or Ultra for competitive games, default otherwise | Reduces render queue delay in some titles |
| Power management mode | Default or “Normal” | Maximum-performance modes raise idle power and heat for small gains |
| Colour range | Full RGB (0-255) on PC monitors over DisplayPort | Prevents washed-out blacks |
| Shader cache | Driver default | Speeds up repeat loading in games |
Leave overlays and automatic game optimization suggestions off until you have played a few games and know what you want. An installed overlay that you never use is one more thing that can interfere with a game.
Step 7: Windows gaming settings
- Game Mode: open Settings, then Gaming, then Game Mode. It is on by default in current Windows 11 builds. It is intended to prioritise a running game and reduce background tasks such as Windows Update restarts.
- Graphics settings: in Settings, System, Display, Graphics, you can review hardware-accelerated GPU scheduling and set per-app GPU preferences. Leave the default unless a game is misbehaving.
- Power plan: on a desktop, “Balanced” is a reasonable default; “Best performance” mostly raises idle power consumption.
- Storage: install the games you play most on the fastest SSD, and keep at least 15 to 20 percent of the drive free so it can maintain write speed.
- Startup apps: in Task Manager’s Startup tab, disable launchers and utilities you do not need at login.
- Notifications: turn on Focus or Do Not Disturb while gaming so pop-ups do not interrupt full-screen games.
Step 8: Updates, backups and recovery
This step feels optional, which is why it is skipped, and then regretted. Take ten minutes now.
| Task | How | Why |
|---|---|---|
| System restore point | Search “Create a restore point”, enable protection on the system drive, create a point named “Fresh setup” | Lets you roll back after a driver or update issue |
| File backup | Use Windows Backup, an external drive, or cloud storage for documents and screenshots | Game installs can be re-downloaded; your files cannot |
| Cloud saves | Enable cloud sync in Steam, the Epic Games Store, or the publisher’s launcher | Protects save files across reinstalls |
| Account recovery | Confirm Microsoft account recovery email and phone | Required to regain access if you forget a PIN |
| Driver backup note | Write down the driver versions that work well | Makes rolling back a bad driver simple |
| BIOS update plan | Check the motherboard maker’s page every few months | Updates can fix memory compatibility and add CPU support |
Set Windows Update active hours so restarts do not land in the middle of an evening session, and pause updates only for short periods, because deferred security patches add risk.
Common first-day problems and fixes
| Symptom | Likely cause | Fix |
|---|---|---|
| Monitor stuck at 60 Hz | Wrong cable or port, missing graphics driver, refresh rate not selected | Use DisplayPort, install the graphics driver, set refresh rate under Advanced display |
| RAM shows a slow speed | XMP or EXPO not enabled | Enable the profile in the BIOS |
| No sound | Wrong output device, monitor audio selected | Right-click the speaker icon and choose the correct output device |
| Wi-Fi missing | Driver not installed, antenna not attached | Attach the antenna, install the driver from the motherboard maker via another device |
| Fans loud at idle | Default fan curve, background updates | Wait for updates to finish, adjust curves in the BIOS |
| Game launches on integrated graphics | Wrong GPU preference | Set the game to High performance in Graphics settings |
| Frequent crashes | Unstable memory profile, outdated chipset or graphics driver | Update drivers, then try a lower memory speed or a BIOS update |
A sensible first-week routine
- Day 1: finish the eight steps above and install one or two games.
- Day 2 to 3: watch temperatures during a long session with a monitoring tool. Idle CPU temperatures in the 30s to 40s Celsius and load temperatures well below the manufacturer’s maximum are a good sign.
- Day 4 to 7: install the remaining launchers and peripheral software, set up cloud saves, and check for BIOS and driver updates.
Keep the original boxes and receipts for the return window, and register the product for warranty if the maker requires it.
How we compared
We compared manufacturer manuals, specifications and independent guides named below. We did not build or benchmark these systems ourselves.
Sources
- Microsoft, Windows 11 specifications and system requirements
- Microsoft support, Windows 10 support end-of-life notice
- HDMI Licensing Administrator, HDMI 2.0 and 2.1 bandwidth specifications
- VESA, DisplayPort 1.4 and 2.x specifications
- NVIDIA, AMD and Intel graphics driver and control panel documentation
- AMD EXPO and Intel XMP memory profile documentation
- Motherboard manufacturer manuals for BIOS navigation
Frequently Asked Questions
What should I do first when I turn on a new gaming PC?
Confirm the monitor is plugged into the graphics card, boot into the BIOS to enable the memory profile, then complete Windows setup and run Windows Update before installing any games.
Do I need to install drivers on a prebuilt?
Usually the system comes with drivers, but they are often older. Install the latest graphics driver from NVIDIA, AMD or Intel, and the chipset driver from the CPU or motherboard maker.
Why is my 144 Hz monitor running at 60 Hz?
The most common reasons are a cable that does not support the mode, a missing graphics driver, or Windows not having the highest refresh rate selected in Advanced display settings.
Is XMP or EXPO safe to enable?
It applies a memory profile stored on the RAM by its manufacturer. It is widely used, but if the system becomes unstable, update the BIOS or choose a slower memory setting.
Should I use Windows 10 or Windows 11?
Windows 10 reached end of support on October 14, 2025, according to Microsoft, so Windows 11 is the sensible choice for a new gaming PC.
Do I need antivirus software?
Windows Security is built into Windows 11 and provides baseline protection. Many gamers use only that, plus sensible download habits.
How much storage should stay free?
Keep roughly 15 to 20 percent of an SSD free so it can manage writes efficiently, and move rarely played games to a second drive.
How often should I update drivers and the BIOS?
Update graphics drivers when a new game you play needs it or fixes a problem you have. Check for BIOS updates every few months and apply them only when they address something relevant, such as memory compatibility or new CPU support.